Element G: Construction of a Testable Prototype
Introduction & Background Information
The construction process of the prototype began with creating a housing case for all of the components. These include the Arduino Uno, Neo M8U GPS module, HM-10 module, and a battery pack. A true final design would not use a battery pack but rather connect to a car through the OBDII port and be charged using the car's battery. However, for their prototype and testing purposes, the team decided to use a battery pack to save money. The case needed to be big enough to house all of these components, while still being compact enough to be placed in a car without taking up excessive space. Due to the availability of materials and cost-effectiveness, The team decided to make the case using a 3D printer and ABS plastic. The team's original design was composed of a longer wire and speed projector and was to be placed on a car's dashboard, but the team decided to refine this into a much simpler product in response to feedback from peers and teachers. With the purchased Arduino Uno, NeoM8U, GNSS Antenna, and HM-10 module, the team began working on the code for the software, which is the current task.
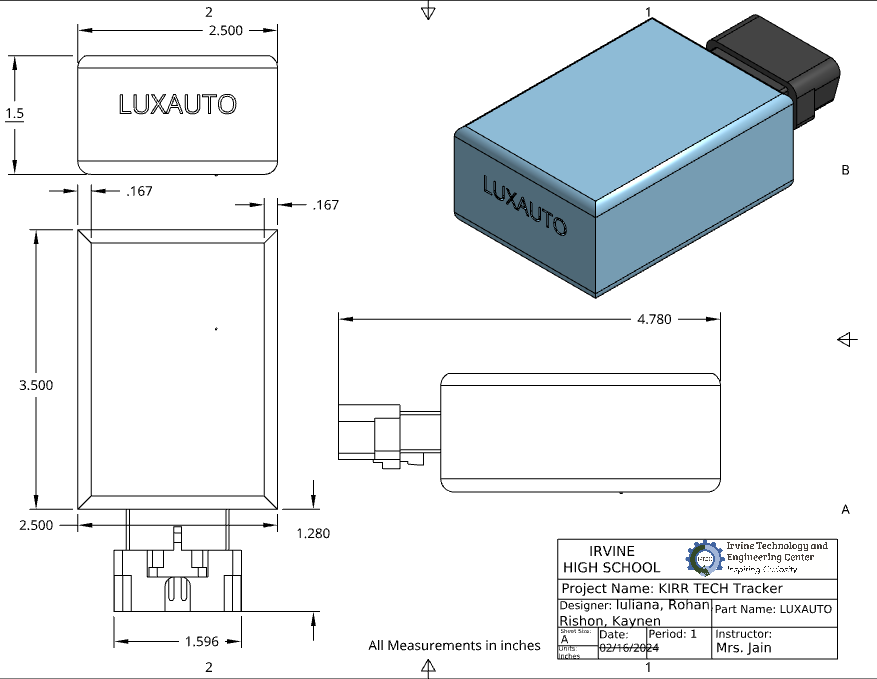
The team had many design requirements created before making the prototype that they had to adhere to. The first requirement was performance, where it was stated the tracker should have an accuracy within 20 feet, along with being able to show elevation in parking garages. The team cannot say whether the device meets these requirements yet, as this is part of the testing plan. The next requirement was compatibility, stating that the tracker should be able to plug into an OBDII port and work with all operating systems. The prototype does not have an OBDII port, but this was due to cost, a true final design will have an OBDII port. The prototype's software will be able to work with all operating systems. Another design requirement was size and weight, where the team made it necessary for the tracker to be compact and not intrude on the driver. The prototype is 3.5 in x 2.5 in x 1.5 in, so the compactness requirement was met. Another requirement was durability, which the team accomplished with a sturdy case that protects the inside components. Cost and Material were another requirement stated, with the team mandating a cost between 25-55 dollars, and should be made with plastic. The materials requirement was fulfilled, as the 3D printed case is made with ABS plastic, a cost-effective yet durable material. The prototype with all of its components ended up costing 74 dollars in total, so the team went over their predetermined budget. However, when buying in bulk, the price of all the components is cut in half, so when selling the product to consumers, the tracker can be sold within the team's earlier price range. The next requirement is shelf life, where the team required a 3-4 year service life, however, this is not possible for the team currently. The final design requirement was ensuring a user-friendly design. The team is making code and interface very easy to manage and can be set up very quickly.
Building and Testing Plan
The team's Building Plan included buying, gathering, or creating all required components for the device, including NEO M8U microchip, Arduino Uno R3, Antenna, cables, and 3D printed case. After Neo M8U delivery, the team will solder pins onto the microchip and connect wires from NEO M8U Ground, 3.3V, SDA, and SCL ports to the corresponding Arduino Uno R3 ports, as well as connect Antenna to the microchip. Based on the created CAD model, they would create a 3D-printed box case to protect the device from damage. After assembling everything, the device will be done and ready for coding and testing.
The team's Testing Plan implied testing the device in four different locations: the engineering classroom at Irvine High School to test out the basic functions of the device, Irvine High School's parking lot, and the Spectrum parking lot to test its effectiveness in multi-storied structures, and finally the Great Park parking lot to profoundly test all device functionality. Mainly, the team would test how well Luxauto performs its task, including connectivity range, accuracy of position calculation (both on the Luxauto and mobile application side), no-loss communication between device and phone, and accuracy of the drawn path from phone to the device (both in GPS-access area and without it). The team will also measure the time the battery takes to change to maximum capacity as well as battery life from a single charge, making sure that it fulfills Design Requirements.
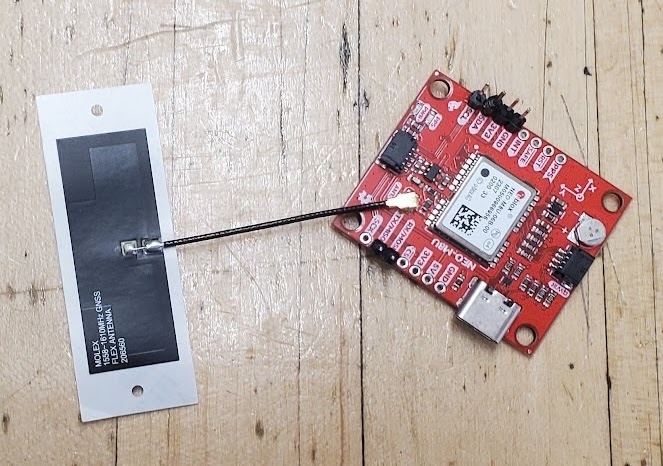
The team's Material List included several devices. The first item is SparkFun GPS Dead Reckoning Breakout - NEO-M8U (Qwiic) (one quantity) from SparkFun with a cost of $69.95. The SparkFun NEO-M8U GPS Breakout features u-blox's Untethered Dead Reckoning (UDR) technology, providing continuous navigation without vehicle electrical connections. Its GNSS and integrated 3D sensor offer accurate positioning rates up to 30Hz. Configurable via u-center, it supports various functions like baud rates, geofencing, and spoofing detection. The onboard rechargeable battery reduces the time-to-first fix from cold to hot start and maintains RTC and GNSS orbit data. It's the ideal choice for fulfilling a team's design requirements and solving the defined problem.
The second item is Molex Flexible GNSS Antenna - U.FL (Adhesive) (one quantity) from SparkFun costing $4.50. The Molex GNSS Flex antenna is a great option for basic GNSS applications, compatible with any U.FL-equipped GNSS board. It supports GPS, Galileo, BeiDou, and GLONASS across three frequency bands. It's easy to install using its adhesive pad. It fulfills the antenna capabilities required for the team's device at a cost-effective price.
The third item is Arduino Uno REV3 [A000066] (one quantity) from Amazon with a cost of $27.60. Arduino Uno R3 is a microcontroller board based on the ATmega328P. With seamless integration and Bluetooth functionality crucial for the team's device, it is compatible with the NEO M8U microchip, enabling data reading and analysis with precision. It is powerful enough for Luxauto, is easy to use, and is cost-effective, which made the team select the board for their project.
The fourth item is the HM-10 Bluetooth 4.0 Low Energy Module for Arduino (one quantity) from Amazon with a cost of $10.99. This module has a Bluetooth feature and is compatible with IOS, which is crucial for sending data from the team's device to the iPhone mobile application.
Prototype Fabrication/Construction
In the initial phase of the team's project, the team meticulously procured all requisite components essential for the assembly of their device, encompassing the state-of-the-art NEO M8U microchip, Arduino Uno R3 microcontroller, specialized antenna, and requisite cables. Employing a judicious approach, they opted to affix pins onto the microchip, mitigating the risk of inadvertent damage that may arise from direct soldering of wires. This strategic decision not only safeguards the integrity of the M8U but also streamlines subsequent assembly procedures. Subsequently, the team seamlessly interfaced the wired connections onto the Arduino Uno R3, capitalizing on its integrated wire slots for expedited integration, complemented by its intrinsic rechargeable battery functionality. Concluding the assembly phase, the fully integrated device was encased within a custom-designed 3D-printed housing. With the hardware assembly concluded, the team's focus now shifts towards the pivotal stages of coding and rigorous testing to ascertain the operational efficacy of the device.
Detailed Drawings
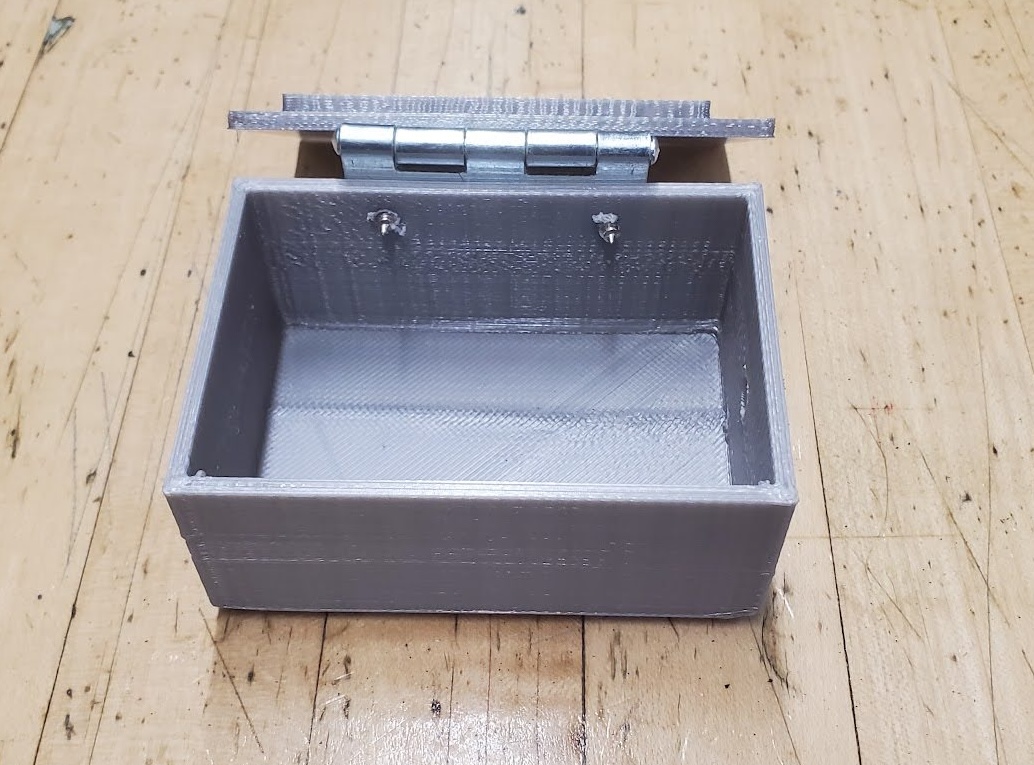
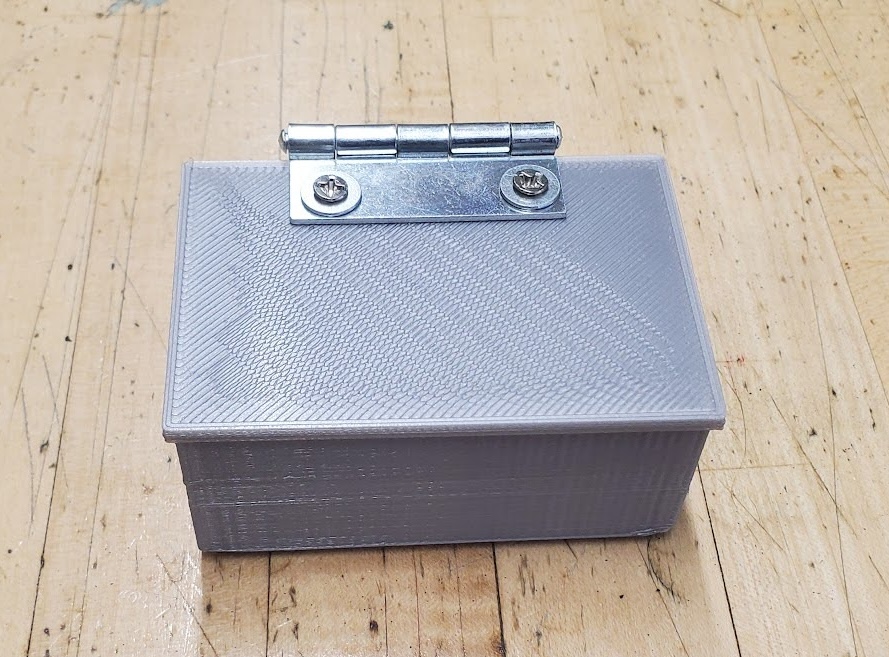
Initially, the team focused on improving the product's functionality and user convenience. The team chose to transform its form into a compact box shape that was meticulously designed to accommodate all necessary electronics seamlessly. The addition of a hinge emerged as a critical feature, allowing users to switch between open and closed configurations. This not only prioritized safety but also provided easy access to internal controls whenever necessary. Furthermore, the team strategically included a single aperture at one end, which serves two functions: charging while the electronics remain inside the box and enabling seamless connectivity to one's vehicle, thereby increasing its utility and versatility.
The team is in the process of creating App/Software Prototypes. They are creating two programs: one is an Arduino program written in C++ language and one is a cross-platform application written in React Native framework. The general algorithm of the device-phone work is the following:
- The device constantly tracks its location both when GPS is available and when it is not, since it has the Untethered Dead Reckoning (UDR) technology, which allows it to calculate new location based on the last known location, direction, and speed of the car.
- When a car enters a parking state, the device sends its current location (real-time or calculated using UDR) to the user's phone through Bluetooth.
- If the phone does not have a connection to the internet, it uses the position of the car and some version of the UDR to calculate its current location, as well as show the path to the car if the user asks for it.
- When a phone has a stable internet connection, it updates the user's location through GPS and also sends the car's location to the server.
- Similarly, when the user comes back to the car, mobile applications use the last known location of the user to calculate its new one, as well as draw the path if needed.
The Arduino program is currently undergoing development and testing phase, while the App program is in the planning and ideation phase, finalizing the last details before starting to coding. Arduino program and pseudocode:
/*
Project Name: Find Parked Car
Date: 04/12/2024
Created by: KIRR TECH
Period: 1
PSEUDOCODE
Setup:
- Initialize serial, I2C communication
- Define Bluetooth module pins
- Initialize necessary variables
Main Code:
- Once in few seconds, get GPS data if the data is reliable enough (more than few satellites available)
- If GPS is not available, sue last known location to calculating location using build-in UDR
- If the device enters the parking state:
- Record the time when the parking state started, remember current position and send location data via Bluetooth to the phone
- Add a delay to control the frequency of checking the parking state and sending data
isParkingState function:
- Determine if the device is in the parking state
- Return true or false based on the condition
sendLocationData function:
- Format the location data as a string
- Send the location to the phone via Bluetooth
*/
#include
Pseudocode for the mobile application:
- Import libraries and initialize all necessary variables - Set up Bluetooth communication - For the first connection to the device, scan available bluetooth devices and write down its address. After it, phone will be regularly connecting to the Arduino module via Bluetooth - Continuously listen for location updates from the Arduino module. - If user requests, utilize navigation APIs to draw path on map from known car location and known/calculated user location - If GPS is available, track user's location using it - If GPS is not available, use known location of the car and similar UDR for tracking user's location
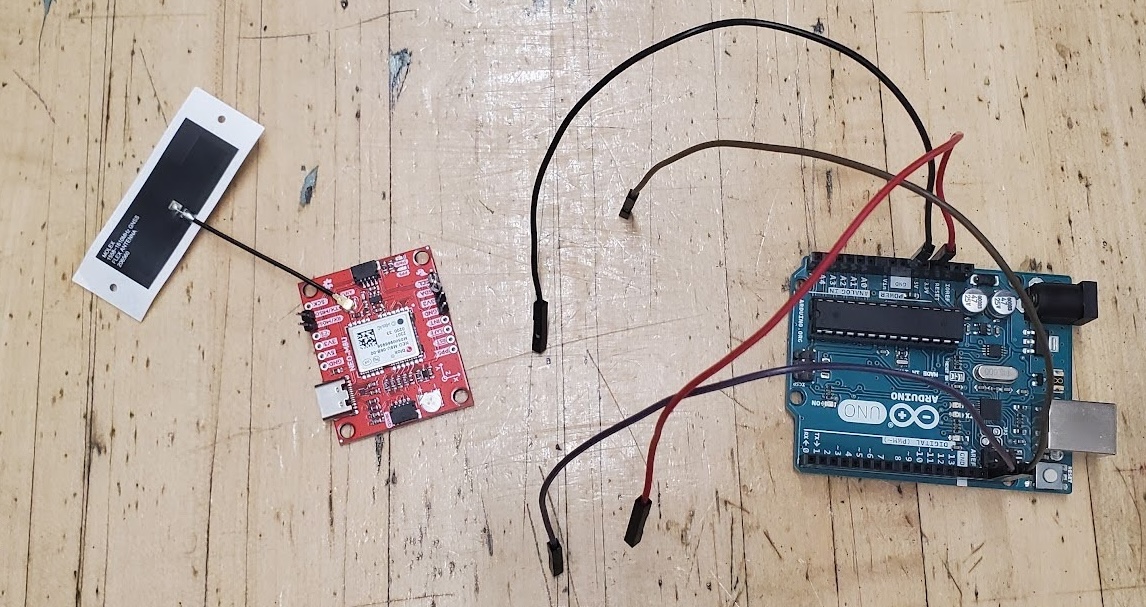
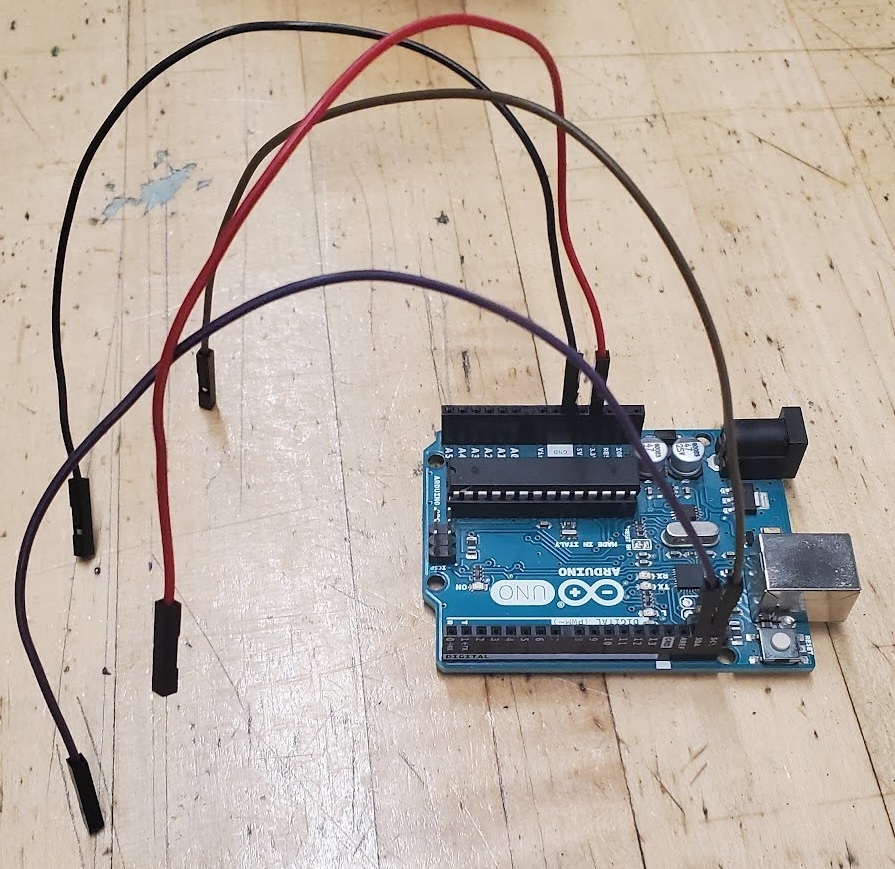
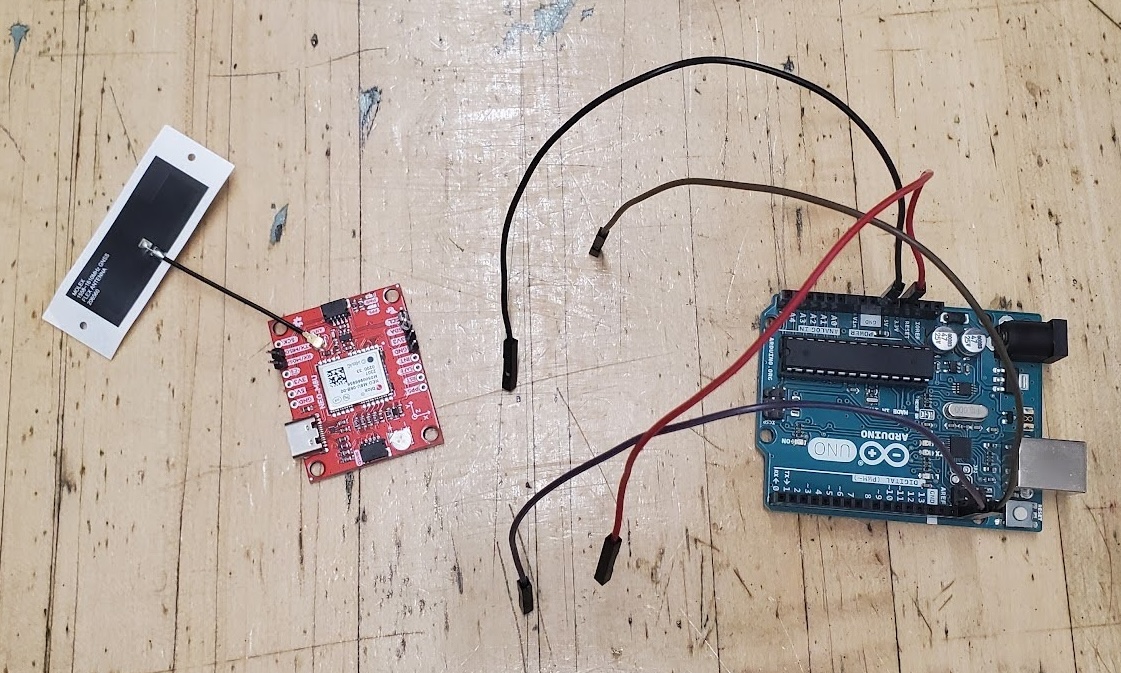
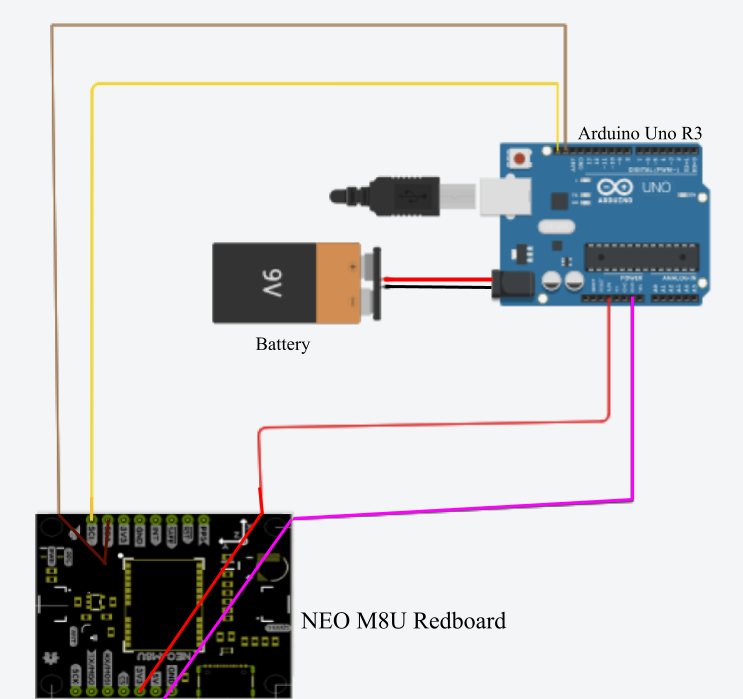
The Electronic Prototype construction began with connecting the power wires to the Arduino Uno R3. To do this, solder a black wire to the ground and a red wire to 3v3, extending the connection in the same manner as the NEO m8u. There are then two more wires needed for the GPS tracking system; the first pair are for SCI and SDA on the Arduino Uno R3, respectively, and are connected back to the NEO m8u. SCI to SDA and SDA to SCI are involved in this relationship. Finally, a standard 9-volt battery is used as the power source.
The team will test their device by going to four different locations, including the Heritage Library parking lot, Heritage Plaza, and Great Park. At all those locations, the team will test how well and accurately the device functions, testing all features and design requirements, if possible.
Among testable design requirements are performance (connectivity range), compatibility, size & weight, durability, service life & maintenance, and materials used. To test the range of the device, the team will put the product at a disclosed location and one team member starts walking away from it with a connected phone until the device disconnects, recording the distance from the point of disconnection to the device. Size (3.5 x 2.5 x 1.5 inches) and weight (under 250 grams) requirements were confirmed using professional tools (measuring tape and weights) - the device follows these constraints. To confirm the required durability, the team will ride with the device in the car, simulating the stress of real-life situations. The cost requirements of the device to be within $20 to $55 will be fulfilled as if to assume mass-production of the device, meaning mass-purchase of the components, the final device cost will be as follows:
| Name | Price per Unit | Quantity |
|---|---|---|
| NEO M8U 06B Module | $24.92 | 1 |
| Molex Flexible GNSS Antenna | $2.27 | 1 |
| Arduino Uno REV3 [A000066] | $$27.60 | 1 |
| HM-10 Bluetooth 4.0 module | $10.99 | 1 |
| Total: | $65.78 |
Therefore, the total cost of the device will be $65.78, which is outside the price range and therefore the team failed the cost requirement.
The Service Life requirements also will be fulfilled as batteries, connected to the drive, have service of life up to 10 years, Arduino Uno R3 from 10 to 15 years, and around the same period for NEO M8U and Antenna parts. Regular maintenance will be simulated, by changing the battery using regular home tools. The period through which the device can operate without changing the battery will be calculated.
The team's prototype, unlike future products, will not fulfill the compatibility requirement, as the device will not connect to the car's UBII port - it will connect to regular batteries instead. Not using a UBII port connection is a necessary simplification of the product to help produce it quicker and more qualitatively, having more time to focus on other more important parts, such as profoundly testing its software functionalities.
The material design requirement - meaning, stiffness, and strength - will be tested by installing and securing all electronic parts wrapped in soft materials inside the case and applying the maximum possible stress on the device by dropping it a couple of times from meter height to the ground. The team will then check all wires, overall wholeness, and performance of the part to confirm that the material used for the case and electrical parts is strong enough and provides enough protection for the device.
The design requirements that cannot be physically tested include user-friendly design. The team's device will fulfill the requirement as the device requires only one calibration period after purchase and a quick first connection to a phone, after which it operates automatically. The application's design will also prioritize user-friendliness and intuitiveness, meeting this criterion. As evidence, the team had inquired Mr. Frijo Franco, Director, of Systems Engineering at Thales Inflyt Experience, about his opinion on how well a prototype will meet this criterion, explaining the working principle. He said that the device appeared easy to use and understandable while suggesting the creation of a detailed instruction manual at later project stages.
Conclusion
In conclusion, the team's building plan included buying, gathering, and/or creating all required components for the device. The team soldered pins onto the microchip and connected wires from NEO M8U Ground, 3.3V, SDA, and SCL ports to the corresponding Arduino Uno R3 ports, and the antenna to the microchip. The team also created a 3D-printed box case for housing and protection. After assembling everything, the device will be done and ready for coding and testing.
Once tested, the solution will reveal its exact range, as well as its overall accuracy. Some of the exact specifications of the outside model housing all the circuitry had to be slightly adjusted to accommodate the production means the team had access to. However, these changes are aesthetic, so the product overall remains the same. Some problems the team encountered had to do with the complex wiring and circuitry. The team faces difficulties managing each intricate component, as well as all of its connections. These difficulties were further compounded due to the small spatial clearance in which it all had to fit into. The team estimates that the device's range and accuracy will at least somewhat match that of the team's range and accuracy design constraints, which the team can justify by referring to the Neo M8U range and accuracy specifications.
